Salesforce Integration (LP Classic)
This documentation is for LiquidPlanner Classic: app.liquidplanner.com
Apex Web Services and Callouts
You can invoke the LiquidPlanner Classic API from Apex using what Salesforce terms “callouts”:
http://wiki.developerforce.com/page/Apex_Web_Services_and_Callouts
The steps you will take are:
- Create a trial workspace in LiquidPlanner
- Create a Salesforce Developer Edition account
- Configure https://app.liquidplanner.com as a Remote Site in Salesforce
- Create one or more Apex classes that invoke the LiquidPlanner API
Create Accounts
For development and testing, we recommend you create a new trial workspace in LiquidPlanner and use the Developer Edition sandbox in Salesforce. This allows you to experiment without paying subscription fees and without any risk of affecting your production data. Once you’re happy with your integration, you can move the code to your production environment.
LiquidPlanner Trial Workspace
If you already have a LiquidPlanner account, then sign to LiquidPlanner > click the user menu (profile picture) > select Workspace Directory > click the “Start New Trial” button at the bottom of the page to create a new workspace.
If you don’t already have a LiquidPlanner account (or you want to use a separate account for development) then sign up HERE.
Completing the signup process will automatically create a new trial workspace.
Salesforce Developer Edition
If you don’t yet have a Developer Edition account, then sign up for one here: http://www.developerforce.com/events/regular/registration.php
Add LiquidPlanner as a Remote Site
Follow these instructions: https://login.salesforce.com/help/doc/en/configuring_remoteproxy.htm to register this URL:
https://app.liquidplanner.com as a Remote Site in Salesforce.
Create Apex Classes
The following is a “Hello, World!” example in Apex that fetches your account details from LiquidPlanner. We’ve favored simplicity and concision over robustness; there is little or no error handling, and credentials are hardcoded. You should follow best practices (catching and handling exceptions, abstracting out configuration, etc.) when building your production system.
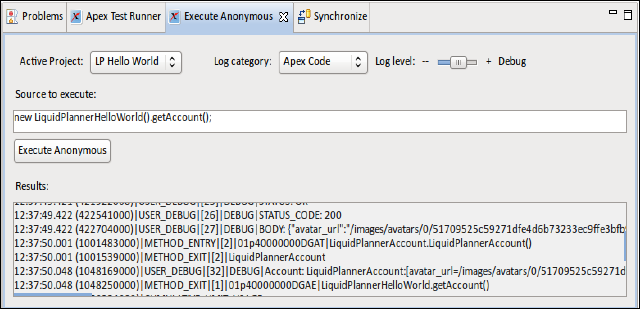
Once you have created these classes, you should be able to run code like:
new LiquidPlannerHelloWorld().getAccount()
and see results like this (pictured in the Force.com IDE):

LiquidPlannerAccount Class
This is simply a data record to store results fetched from LiquidPlanner.
public class LiquidPlannerAccount {
  public Integer id;
  public String type;
  public Integer created_by, updated_by;
  public DateTime created_at, updated_at;
  public String avatar_url;
  public String company;
  public String timezone;
  public String first_name, last_name;
  public String user_name;
  public String email;
  public String[] workspaces; // TODO: LiquidPlannerWorkspace[]
  public Integer last_workspace_id;
  public Integer disabled_workspaces_count;
}
LiquidPlannerHelloWorld Class
This class actually does the work of requesting your account information from LiquidPlanner.
public class LiquidPlannerHelloWorld {

  static final String LP_URL = 'https://app.liquidplanner.com/api';

  // These are hard-coded to keep this example simple.
  // In a production system, you should store these in a custom object.
  static final String LP_EMAIL = '[email protected]';
  static final String LP_PASS  = 'your_password';
  // Return an HttpRequest with its HTTP method, URL (relative to LP_URL),
  // and Basic Auth header initialized.
  private HttpRequest createRequest(String method, String url) {
    HTTPRequest req = new HTTPReqest();
    req.setEndpoint(LP_URL + url);
    Blob headerValue = Blob.valueOf(LP_EMAIL + ':' + LP_PASS);
    String authorizationHeader = 'BASIC' + EncodingUtil.base64Encode(headerValue);
    req.setHeader('Authorization', authorizationHeader);
    req.setMethod(method);
    return req;
}

  //Perform a GET request to url, returning the HTTPResponse
  private HttpResponse doGet(String url) {
    HTTPRequest req = createRequest('GET', url);
    HTTPResponse res = new Http().send(req);
    System.debug('STATUS: ' + res.getStatus());
    System.debug('STATUS_CODE: ' + res.getStatusCode());
    System.debug('BODY: ' + res.getBody());
 	return res;
}

  //Get the LiquidPlannerAccount associated with our login
  public LiquidPlannerAccount getAccount() {
    HttpResponse res = doGet('/account');
    JSONParser parser = JSON.createParser(res.getBody());
    parser.nextToken();
    LiquidPlannerAccount account =
      (LiquidPlannerAccount) parser.readValueAs(LiquidPlannerAccount.class);
    System.debug('Account: ' + account.toString());
    return account;
  }
}
References
Apex
http://www.salesforce.com/us/developer/docs/apexcode/Content/apex_intro_what_is_apex.htm
Apex is a strongly typed, object-oriented programming language that allows developers to execute flow and transaction control statements on the Force.com platform server in conjunction with calls to the Force.com API.
Apex Callouts
http://wiki.developerforce.com/page/Apex_Web_Services_and_Callouts
With 'Callouts', where Apex invokes an external web service, Apex provides integration with Web services that utilize SOAP and WSDL, or HTTP services (RESTful services) … Additionally, Apex supports HTTP services to use HTTP Request and Response objects to invoke the external web service.
JSONParser
Parse JSON by one line of code using Winter’12 JSON API
http://www.tgerm.com/2011/10/winter12-jsonparser-serialize.html
Salesforce Winter’12 release came with a great API addition to Apex stack i.e. JSONParser. This parser solves all the classic problems using open source Apex based JSONObject.cls.
This post is an attempt to discuss how one can simplify both JSON operations like JSON serialization and deserialization(parsing) using the new System.JSON API.
Updated 12 months ago
