Working with the LiquidPlanner Classic API
This documentation is for LiquidPlanner Classic: app.liquidplanner.com
Which version of LiquidPlanner are you using?Before getting started with the API, it's important to confirm that you are accessing the right documentation for your account.
This documentation is for LiquidPlanner Classic: app.liquidplanner.com.
If your account is on LiquidPlanner New (next.liquidplanner.com) please go to the API Guide for LiquidPlanner New.
Prerequisites for working with the LiquidPlanner Classic API
We assume that you already have a LiquidPlanner Classic workspace and some familiarity with the app (app.liquidplanner.com). If not, please check out the Classic Product Support articles on our website.
Create a Sandbox Workspace

Open the Workspace Directory and use the Start New Trial button to create a sandbox workspace.
We recommend that you create a new Classic workspace for your initial API experimentation and testing. This way you won’t disturb your production data (or other users of your production workspace); you can work with a small and controlled set of data, and you can easily clean up (or start over) if things go sideways.
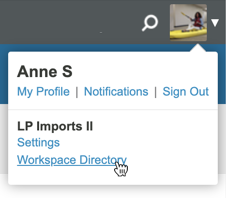
If you already have a LiquidPlanner Classic account, then sign in to the workspace, click the User Menu (profile picture in the upper right) > select Workspace Directory > click the “Start New Trial” button at the bottom of the page to create a new workspace.
If you don’t already have a LiquidPlanner account (or you want to use a separate account for development) then sign up HERE.
Please note that workspace members who have SSO enabled will not be able to use the API.
Examples Format and Conventions
Throughout this guide, we’ll provide examples using curl. We use curl because it is available across platforms and assumes no knowledge of any particular programming language.
If you’d like to use the API with a particular programming language, it is very likely that your language of choice has an HTTP request library. All the examples in this document should map directly.
Examples will look like:
% command arg1 arg2 ... argN
... command output ...
where the “%” is your command prompt.
Long command lines may be continued to the next line by ending the line with a backslash. To execute a command, type the command followed by its arguments, and hit enter.
You should get output similar to that in our examples (though we’ve reformatted, truncated, or omitted example output for readability).
In our examples, we use :id in the request URLs as a placeholder, and you should substitute values specific to your data (your workspace ID, the ID of one of your tasks, etc).
Base URL
All API requests are made relative to this base URL:
https://app.liquidplanner.com/api/v1
The base URL may change (for example, it could move to a separate hostname dedicated for use with the API); use a configuration setting or symbolic constant for it in your code.
Updated 12 months ago
